Baby Shower: April 2011

9.25.2010

Sophia's Rocking Chair

What do you buy a 3 year old for her birthday? Barbies? Clothes? All of these are great ideas but I like to give something more meaningful. In the past I have made personal bird houses for each one of my family members (the bird houses looked like their actual houses).  I have made crafts boxes for the little members of my family and filled them with coloring books, crayons, markers, stickers and other things that they can play with. This coming week there is a very special birthday girl! So back to that question of what to buy? I bought a raw rocking chair. There was no paint on it and it needed some sanding done to it. After making it smooth with some putty and sand paper, I painted it over and over with white paint till it was evenly coated. Then, using a rubber stamp and black ink, I printed a paisley pattern on the seat of the chair. After I got the design correct I went over the black ink with different color acrylic paint. To finish it off, I painted her name on the top of the chair (this way her two other sisters won't steal it, hehe ). I hope she loves it!
Part Raw, Part White. The first stage of the project

In order to get all the spots of the chair you have to move and rotate the chair all around

Paisleys are painted!

Up close!

The Paisleys are pink, purple, and blue

Taa Daa!!!...almost just have to add a few details to the name

I added pink dots and blue line accents

Now it's all done!

9.23.2010

Glass Pumpkins

So I had this brilliant idea to take old glass jars and spray paint them to make them look like jack-o-lanterns. I am huge into recycling so I thought this was a good way to get some re-use out of glass jars. Using all different sizes and two different color spray paints I was able to create a little pumpkin patch! Unfortunately...I deleted all of my photos that I took of the process of making them. I was very disappointed and upset with my self for doing so. However it is not difficult to make them yourself! Using masking tape, simply cut out shapes that you want to be protected from the paint (such as the eye, nose, and mouth). After the tape is on the glass, spray away! Let dry for about 30 minutes, peel that tape away, and you have a master piece! To finish them I bought natural colored raffia to tie around the head of the jars. Taaa Daaa!
My Pumpkin Patch!

Spoookkkkyyy

Some are happy, Some are scary!


My Favorite One!

They're Versatile! I used it as a vase while I had sunflowers from my garden still! Great centerpiece for a Halloween party!

9.13.2010

Past Events


Though I have always been planning parties, it wasn't until I was in 10th grade when I realized that I wanted to become an event planner full time as my career. So starting that year I took photos of all my work to create my portfolio. Over the years it has grown, and grown...anddd grownnn. This blog is to showcase some of my favorite pictures from each event. What I truly love about my photos is the transition from amateur planning to elegant elaborate events. I am still learning and love input about my work so please, any advice, questions, comments are greatly imprecated!

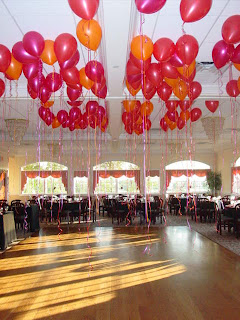
The theme was "Red Hot" so to create more of the reddish tone in the room I decided to get balloons. I thought 100 would cover a good portion of the entire room, however now I know 100 balloons does not go too far. It worked out though becuase the balloons covered all of the dance floor.


This was my Junior Senior Prom 2005 for Rhinebeck High School. I had this great idea to hang gerber daisies upside down. It came out awsome. My mom had such a wonderful time hanging them all (hehe).

These were the table arrangements. We did three gerbers with floating candles. A local candy shop donated red hots (the candies) which we spread around the table and also gave as the favors in little tin cans.
close up of the tables
I think this may be a very long blog since there are much more events and the first one already had 4 pictures! :-) It is just so hard to choose between all the pictures that I have taken.
This was Thankgiving 2005. My aunt as a big thankgiving ever year and I am incharge of the table decor, seating cards and arrangment of guests and all that fun stuff! This year was the year of pumpkins.
I used spider mums and put them inside smaller sized pumpkin .


For the place cards I used real mini pumpkins and used floral wire to twist the paper leaf I created around the stem of the pumpkin. The left over wire I curled around to make it look viney like a real pumpkin.

As much as I wanted to get more done tonight these few pictures have already taken about 30 minutes! Tomorrow night I will be back on with more events!

9.09.2010

Glittered Skulls

Halloween is one of my favorite holidays! This year I am going all out with decorations. I just can't resist Halloween stuff when I see it in the stores but some of my favorite decorations are the ones that I can create myself. I found these skulls at Michaels craft store.

They were 1.99 a piece and made from paper mache. I simply took Elmer's glue and covered them using the sponge brush. Then I drenched them with Martha Stewart Glitter. This one in the picture I used Crystal Snow glitter which is a white/translucent glitter. It made it look like a real skull! (thanks Gigi for the idea). Though I had glitter EVERYWHERE in the apartment I am so glad that I made them. I am actually going back to get more to make.

Here are the steps to create them.
1. Cover in glitter
 This one was partially done but you can see around the eyes, nose, and cheek there is a clear white color which is the glue


2. Then you take the glitter and pour it all over the the glued area.

TaaaDaaaa


3. Place in home somewhere where you can enjoy it!

9.07.2010

New to the Blog World

I can't lie...this whole blog thing is kind of confusing. But I'm learning! I love sharing with people my creative ideas and the things I am making so I thought by having a blog would be the best vehicle to exhibit my creations. The plan is to show step by step how I make things and to receive feedback on how to improve and what people like the most about my creations. I am very excited to share with everyone my Halloween ideas so stay tuned!